How to refer to the Shape object
We refer to the Shapes collection in a given worksheet as indicated below:
ActiveSheet.Shapes
Then, we can use properties and methods of the Shapes collection as per the Excel object model structure. Some useful methods of the Shapes collection are: AddShape, AddTextBox, AddFormControl, AddPicture, Item, SelectAll. See below an example of the structure (for AddShape see next section).
ActiveSheet.Shapes.SelectAll 'selects all the shapes in the active sheet
ActiveSheet.Shapes.Item(1).Select 'selects the first shape in the active sheet
The latest can simply be referred to as either of the below two
options: the first one using the index, and the second using the shape name. Thus, we refer to a single Shape object.
ActiveSheet.Shapes(1)
ActiveSheet.Shapes("Rectangle 1")
Add new shapes
We use the method AddShape of the Excel VBA Shapes collection to create or add a new auto shape in a given worksheet. Other shapes are added using the corresponding method (AddTextBox, AddFormControl, etc - see later). Excel automatically gives a default name depending on the type of shape (for example, Rectangle 1, TextBox 2, etc), but we can easily change the name of the shape and many other properties (see later). See below the standard statement to add a new AutoShape in the active worksheet.
ActiveSheet.Shapes.AddShape MsoAutoShapeType, pLeft, pTop, pWidth, pHeight
Where MsoAutoShapeType specifies the type of an AutoShape object (MsoAutoShapeType enumeration for Microsoft Office), and pLeft, pTop, pWidth, and pHeight determine the position and size of the shape in points. Note that the pLeft and pTop refer to the upper left corner of the shape in reference to the upper left edge of the worksheet.
In the following example, we add a rectangle to the active worksheet.
ActiveSheet.Shapes.AddShape msoShapeRectangle, 20, 20, 200, 100

In order to add the shape to a specific cell or range in the worksheet, we need to specify the position and size of the shape as follows:

It is more practical to add the shape to an object variable in order to easily apply formatting properties or methods later. In the following example, we define an object variable called “MyShape” to add a rectangle to the active worksheet, then we change the name of the shape and apply any other properties (for this see next section).
We can add other types of shapes such as text boxes, form controls, smart art shapes, pictures, etc, with the corresponding method of the Shapes collection. Each shape type corresponds to a constant in the msoShapeType enumeration. Here are some useful examples.
The code below adds a textbox into the active worksheet with given dimensions (100x60) and some inner text. Note that we use the TextFrame.Characters method to work with text inside the box.

We can add form controls such as buttons, check boxes, combo boxes, etc, with the AddFormControl method of the Shapes collection. For example, to add a command button we can use a similar structure than the one we have seen earlier:
ActiveSheet.Shapes.AddFormControl xlButtonControl, 20, 20, 100, 40
In this particular case we can also use the Buttons.Add method directly. The following subroutine adds a command button to the active worksheet, and assigns another procedure (ButtonAction) to be run when clicked.

Select, copy, and delete shapes
We can select, copy, or delete a shape using the corresponding methods of the Shape object, and specifying that particular shape with either the number or name (as we have seen earlier).
ActiveSheet.Shapes("Rectangle 1").Delete
In order to copy or delete all shapes in the worksheet we need to loop through all shapes using a For Each loop. If you are not familiar with loops, please check the lesson 6 (Conditions and Loops) in the training for beginners. The following example deletes all shapes in the active worksheet:
If we want to select and work with a subset of shapes (more than just one), we have to construct a ShapeRange collection that contains the shapes we want to work with. In the example below, we select a rectangular shape (Rectangle 1) and a textbox (TextBox 2) through an array of shapes. We can now work with those shapes and apply for example formatting properties to both at the same time.
Format shapes
There are a bunch of properties to format shapes in Excel VBA. We can specify the position in the worksheet with the Top and Left properties as we have seen earlier. Similarly, we can set the width and height of the shape with the respective properties of the Shape object.

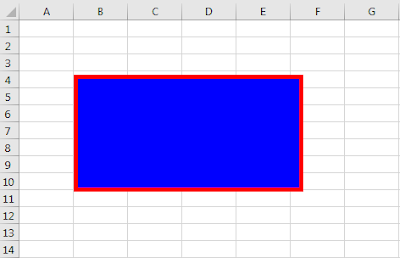
We can also change the aspect of the interior and border of the shape. The following example changes the interior color of the rectangle to blue and sets a thick red border around using the Fill and Line properties.
In order to add text to the shape we need to use the TextFrame property. This may be particularly useful when dealing with textboxes. We use the TextFrame.Characters method to add text, change font properties, etc. The example below adds some text red and bold inside the textbox.

Other VBA Objects


No comments:
Post a Comment